I upgraded to commercial version, but the free version watermark remains

Product:

All Wonder Plugins

Question:

I purchased the commercial version and have received my membership login password. I downloaded the commercial version and followed the upgrade instructions as posted on your website, however, the free version watermark remains.
Continue reading

Search and replace when moving WordPress site

Product:

All WonderPlugin Products

Question:

I am moving my WordPress development site to production. I did a search and replace in the WordPress database, but the images in the carousel slider still link to the old domain.

Continue reading

WordPress Lightbox and AJAX Loading

Product:

WonderPlugin Lightbox

Question:

I’m using my site a plugin that allows me to query the database and show results without requiring to code… I can also filter results based on search queries…

I’m using the lightbox in one page that uses such a filter/query. When I set my plugin to reload the entire page, it works fine (though pretty slow since there’s a lot of data), but if I filter using AJAX (i.e. the results are filtered without reloading the page), then the click event on the links that trigger the lightbox are removed… Therefore, after the first search/filter, the images are not clickable anymore…

Is there a way to prevent this (the click event from being removed)?

Answer:

After you use AJAx adding the data, you can call the following JavaScript to re-init the Lightbox:

jQuery(".wplightbox").wonderpluginlightbox();

Update:

If the issue is caused by Ajax loading of the WordPress theme, please view the following tutorial: WordPress lightbox and Ajax loading WordPress themes

How to add a poster image for HTML5 video lightbox?

Product:

WonderPlugin Lightbox

Question:

I wonder how can I add a poster image for HTML5 video lightbox?

Answer:

The HTML5 poster image feature is available in WonderPlugin Lightbox version 4.0 and above. If you are using an old version, please upgrade your plugin first.

In the plugin, Lightbox Options menu, there is an option "Video poster image (absolute URL)", you can use the option to specify a poster image for all HTML5 videos.

Or you can use a data tag data-html5videoposter to specify a poster image for the lightbox link, for example:

Video Lightbox

The HTML code is as following:

<a href="https://www.wonderplugin.com/wp-content/plugins/wonderplugin-lightbox/images/demo-video0.mp4" class="wplightbox" data-webm="https://www.wonderplugin.com/wp-content/plugins/wonderplugin-lightbox/images/demo-video0.webm" data-html5videoposter="https://www.wonderplugin.com/wp-content/uploads/2014/03/gallery.jpg">Video Lightbox</a>

Open up a Lightbox Gallery

Product

WonderPlugin Lightbox

Question:

Our client is wanting to link an icon that pops-up a Lightbox gallery. Is this possible with your product WonderPlugin Lightbox?

Let me see if I can explain it in more detail.

The client wants on of the logos to open up a Lightbox and that Lightbox have a Gallery of images from that station. These gallery images or thumbnails would not be displayed on that page, just shown when in the Gallery Lightbox.

Do you know if this is possible with your lighbox plugin?

Answer:

You can do it with WonderPlugin Lightbox. With WonderPlugin Lightbox, you need to enter the HTML code manually.

Here is the demo:

The code is as following:


<a href="https://www.wonderplugin.com/wp-content/uploads/2013/12/Island_1024.jpg" class="wplightbox" data-group="mygallery" data-thumbnail="https://www.wonderplugin.com/wp-content/uploads/2013/12/Island_1024-150x150.jpg"><img src="https://www.wonderplugin.com/wp-content/uploads/2013/12/Island_1024-150x150.jpg"></a>

<a href="https://www.wonderplugin.com/wp-content/uploads/2013/12/Dark_Beach_1024.jpg" class="wplightbox" data-group="mygallery" data-thumbnail="https://www.wonderplugin.com/wp-content/uploads/2013/12/Dark_Beach_1024-150x150.jpg" style="display:none;"></a>

<a href="https://www.wonderplugin.com/wp-content/uploads/2013/12/Desert_1024.jpg" class="wplightbox" data-group="mygallery" data-thumbnail="https://www.wonderplugin.com/wp-content/uploads/2013/12/Desert_1024-150x150.jpg" style="display:none;"></a>

<a href="https://www.wonderplugin.com/wp-content/uploads/2013/12/Evening_1024.jpg" class="wplightbox" data-group="mygallery" data-thumbnail="https://www.wonderplugin.com/wp-content/uploads/2013/12/Evening_1024-150x150.jpg"style="display:none;"></a>

In the above code, the first line adds an image to the web page which links to one image in the Lightbox gallery.

The following three lines, we created three hidden links by using css style display:none. Since these three links are hidden, they won't display on the webpage. They will only work for the popup Lightbox.

For all links, we added class="wplightbox" and adds the same data group value data-group="mygallery".

Multiple jQuery loaded in WordPress

Question:

I have a website in progress, I used Wonderplugin for WordPress and as I came across on the development, I cannot get it working.

I already uploaded images and configured everything on WordPress.

I also copied the shortcode to the php page that I am working on. But the carousel does not show up.

Answer:

Normally this problem is that there are multiple jQuery files added to your WordPress.

You can view the HTML source code of your webpage, and check how many jQuery are added in your website. In Google Chrome, you can view the HTML source code with menu View -> Developer -> View Source, then search text "jquery" in the source code.

There should be only one jQuery in the webpage, which is added by the WordPress system.

Some plugins add their own jQuery to the website, and this is not correct. A plugin should always use the system installed jQuery, and the js files added from a plugin will be added after the system jQuery.

A jQuery will destroy all other jQuery functions that are added before it. So if a plugin adds its own jQuery, it may destroy other jQuery functions.

To fix the issue:

In the plugin, Setting menu, you can try to check the option "Add plugin js scripts to the footer". This option will place the plugin js file to the footer and will fix the problem in most cases.

If the above option is not working, you can try to disable all other plugins and see whether the WonderPlugin works. If it works, you can then enable the plugins one by one, and find the plugin that has caused the problem.

If WonderPlugin is still not working after you have disabled all other plugins, then the extra jQuery may have been added manually to the theme or the page, you need to find the code and remove it.

Change Lightbox default size

Question:

I am setting up the Lightbox for Video Commercial version on a clients' site and wondered if there was any way to change the default size?

The Lightbox is responsive but comes in at 960x540 default.

Answer

You can use data tag data-width and data-height to change the default size, for example:

<a href="http://www.youtube.com/embed/YE7VzlLtp-4" class="wplightbox" title="Big Buck Bunny Copyright Blender Foundation" data-width="1024" data-height="576">YouTube Lightbox</a>

How to Manually Upgrade the Plugin Without Losing Existing Work

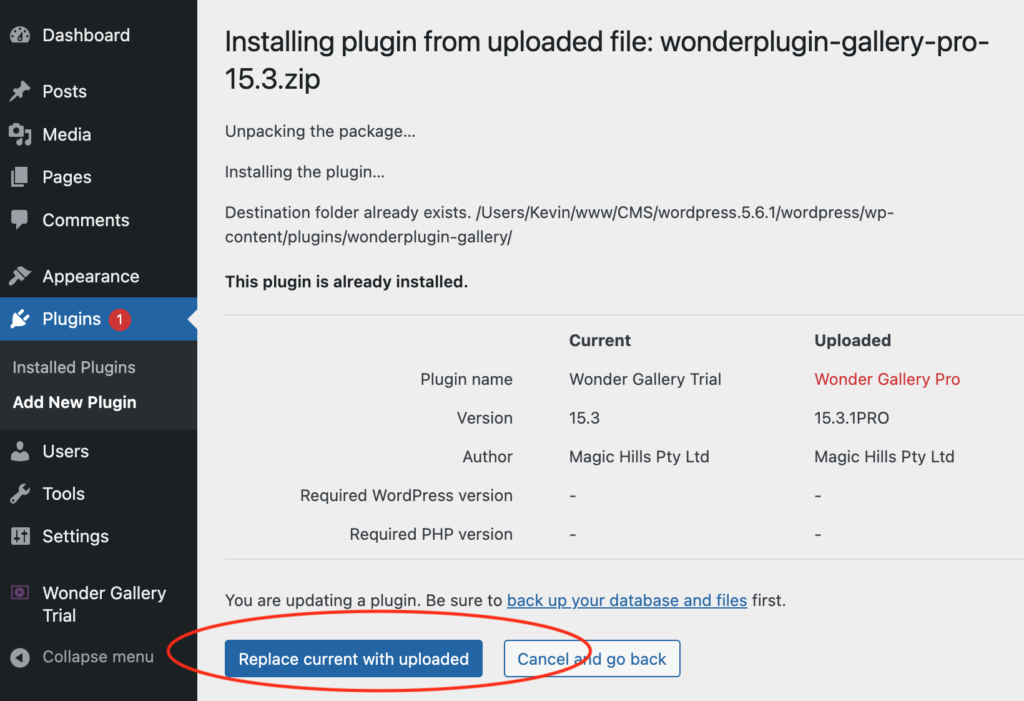
This tutorial guides you through the process of manually upgrading the plugin to a new version. You can follow these instructions to upgrade from the Free version to the Pro version, or to update either version to the latest release.

Before proceeding with the tutorial, we strongly recommend making a backup of your WordPress website.

There are two methods for manually upgrading the plugin to its latest version:

The First Method

There are 4 steps in this method:

Step 1 - Make sure the keep data option is enabled

In your WordPress backend, goto the left menu Plugin Name (e.g., Wonder Carousel, Wonder Slider, etc) -> Settings, make sure there is an option Keep data when deleting the plugin and the option is checked. The option is checked by default. If your current version is very old, it may not have this option. In this case, do not use this method, use the following second method instead.

Step 2 - Deactivate and delete the old version

In the WordPress backend, goto the left menu Plugins -> Installed Plugins, deactivate the plugin and delete it. When deleting the plugin, ignore the warning "Are you sure you wish to delete these files and data" and click the button "Yes, Delete these files and data". This is a standard warning from WordPress.

Step 3 - Install and activate the new version

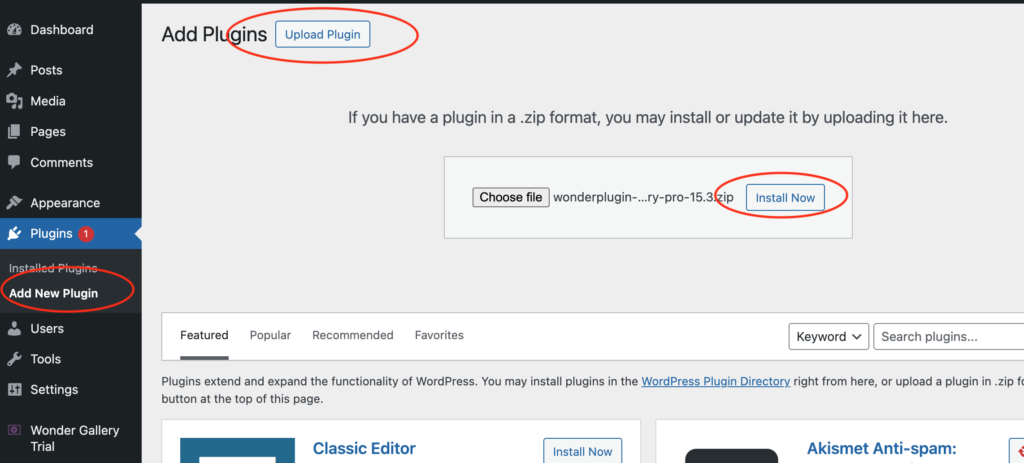
In the WordPress backend, goto the left menu Plugins -> Add New, click Upload Plugin, select the downloaded new version plugin zip file, install and activate it.

Step 4 - Clear WordPress Caches

  • If you have installed a WordPress js/css minify plugin or WordPress cache plugin for example, Autoptimize, W3 Total Cache, WP Rocket, WP Fastest Cache, WP Super Cache, empty all caches from the plugin.
  • Some web hosts, for example, GoDaddy, WPEngine, SiteGround, DreamHost, will also cache web files. You need to clear caches of the web hosting before testing. Please contact your web hosting provider and ask about how to clear caches.
  • Clear caches of your web browser before testing

The Second Method

If you are using a very old version, you may need to use this method to upgrade the plugin. There are 3 steps in this method:

Step 1: Install the new version plugin via FTP

First please extract the new version plugin ZIP file to a folder on your computer, then upload the extracted Plugin folder to the wp-content/plugins folder in your WordPress FTP server.

When a ZIP file is extracted, some unzip software may add a parent folder outside of the Plugin folder. Please make sure you have uploaded the Plugin folder, not its parent folder.

If your WordPress already has an old version installed, make sure to overwrite the existing folder in the server. Or you can delete the old version files first then upload the new version files.

Step 2: Make sure the plugin is activated

In your WordPress backend, left menu, Plugins -> Installed Plugins, find the plugin from the list, make sure the plugin is activated. If it's not, click the Activate link.

Step 3 - Clear WordPress Caches

  • If you have installed a WordPress js/css minify plugin or WordPress cache plugin for example, Autoptimize, W3 Total Cache, WP Rocket, WP Fastest Cache, WP Super Cache, empty all caches from the plugin.
  • Some web hosts, for example, GoDaddy, WPEngine, SiteGround, DreamHost, will also cache web files. You need to clear caches of the web hosting before testing. Please contact your web hosting provider and ask about how to clear caches.
  • Clear caches of your web browser before testing

Hide Lightbox Navigation Arrows

Question:

Hi there,

Is there any code I can use within the script when calling a lightbox to disable the navigation arrows?

As Lightbox cannot auto detect connection speed of the computer accessing my site, I have created a lightbox with a gallery on it underneath that’s a bit of a workaround. When a thumbnail (play video) image is clicked on in my page, lightbox launches with an image. I have made a gallery that displays under the image to either stream HD content, SD content or Low Res content. Works great, but the navigation arrows appear when you hover over the video. I just want to remove these on the video light boxes, but not on the photo ones I have running elsewhere on the site, so I’m not looking for a universal code, just something in the script that calls the lightbox like “navarrows=false” or something like that.

Is that possible?

Many thanks for the help!

Answer:

If you want to hide the arrows on specific pages, you can add the following CSS code to these pages:

<style type="text/css">
#html5-prev {
  display: none !important;
}
#html5-next {
  display: none !important;
}
</style>

How to open video Lightbox on page load

Question:

Support,

I am looking for a solution for displaying a vimeo video in a lightbox that launches with the page load. I am looking at purchasing your commercial version. Is the auto launch feature available or is there additional code I could pay you to develop to accomplish this?

Answer:

You can do it with WonderPlugin Lightbox Plugin.

You can add the following JavaScript code to your page or post:

<script type="text/javascript">
	jQuery("document").ready(function(){   
            setTimeout(function() { 
                if (wonderpluginLightbox)
                    wonderpluginLightbox.showLightbox(4, 'https://player.vimeo.com/video/1084537', 'Big Buck Bunny by Blender Foundation');
            }, 3000);
	});
</script>
<a class="wplightbox"></a>

You can view the demo page: https://www.wonderplugin.com/wordpress-lightbox/open-video-lightbox-on-page-load/

Here is the definition of the function showLightbox:

function showLightbox(type, href, title, width, height, webm, ogg, thumbnail, description);

Here is the definition of the function argument type:

0: image, 1: Flash SWF, 2: MP4 video, 3: YouTube video, 4: Vimeo video; 5: PDF, 7: Webpage

So if you want to open a YouTube video, you can change the line to:

wonderpluginLightbox.showLightbox(3, 'https://www.youtube.com/embed/j32YM7UvvGk', 'WordPress Carousel Plugin');

Only showing up once

To prevent the lightbox popup from appearing in the current web browser session for the second time, you can use the following code:

<script type="text/javascript">
    jQuery("document").ready(function(){  

            var is_popped = false;
            var cookies = document.cookie ? document.cookie.split(';') : [];
            for (var i in cookies)
            {
                var parts = $.trim(cookies[i]).split('=');
                if (parts.length && parts[0] == 'wplightboxpopup')
                {
                    is_popped = true;
                    break;
                }
            }

            if (is_popped)
              return;
            
            setTimeout(function() {
                if (wonderpluginLightbox)
                {
                    wonderpluginLightbox.showLightbox(4, 'https://player.vimeo.com/video/1084537', 'Big Buck Bunny by Blender Foundation');
                    document.cookie = 'wplightboxpopup=1;path=/';
                }
            }, 3000);
    });
</script>
<a class="wplightbox"></a>